Sunday, 26 January 2014

Organising my pantry

Hi everyone :-)
I have had a few requests for a 'How I organise my pantry' blog and video so I thought I'd get it done now before the baby comes and I don't shop for 3 months! ;-)
Here is a breakdown of how I sort my pantry. This is how it looks all the time. I thought it would be best to show an honest view rather than after my 3-monthly clean and spruce up (so be nice!)

When we brought the house we noticed very quickly that the narrow pantry we had was very limited. It looked big enough but when it was full of food it would spill out and we had to reach really far in to get anything. We also had the problem that because of it being narrow and deep it was almost impossible to find anything and we would forever be re-buying stuff we didn't realise we had and finding out of date items way in the back. Quite frankly, it was costing us a fortune!!
So what I ended up doing was a 1-2 day shop. I would buy what I needed for a couple of days and go again a few days later. Not only was this costing us more money doing it this way but I don't enjoy cooking at the best of times and it was such a hassle that sometimes when Dave and I got home from work we would just have 2 minute noodles, toast or take away!
We needed inspiration so off we went off to Ikea where we found the perfect solution to our problems.  Here we saw pull out drawers for deep narrow spaces like ours. You can pull out the whole drawer/shelf and can get easy access to everything and can see all the way to the back. It was perfect! The only problem was they were not cheap. However, having a carpenter as a husband can be very 'handy' at times I tell you! So when we got home I sent him to work building pull out drawers for our pantry.

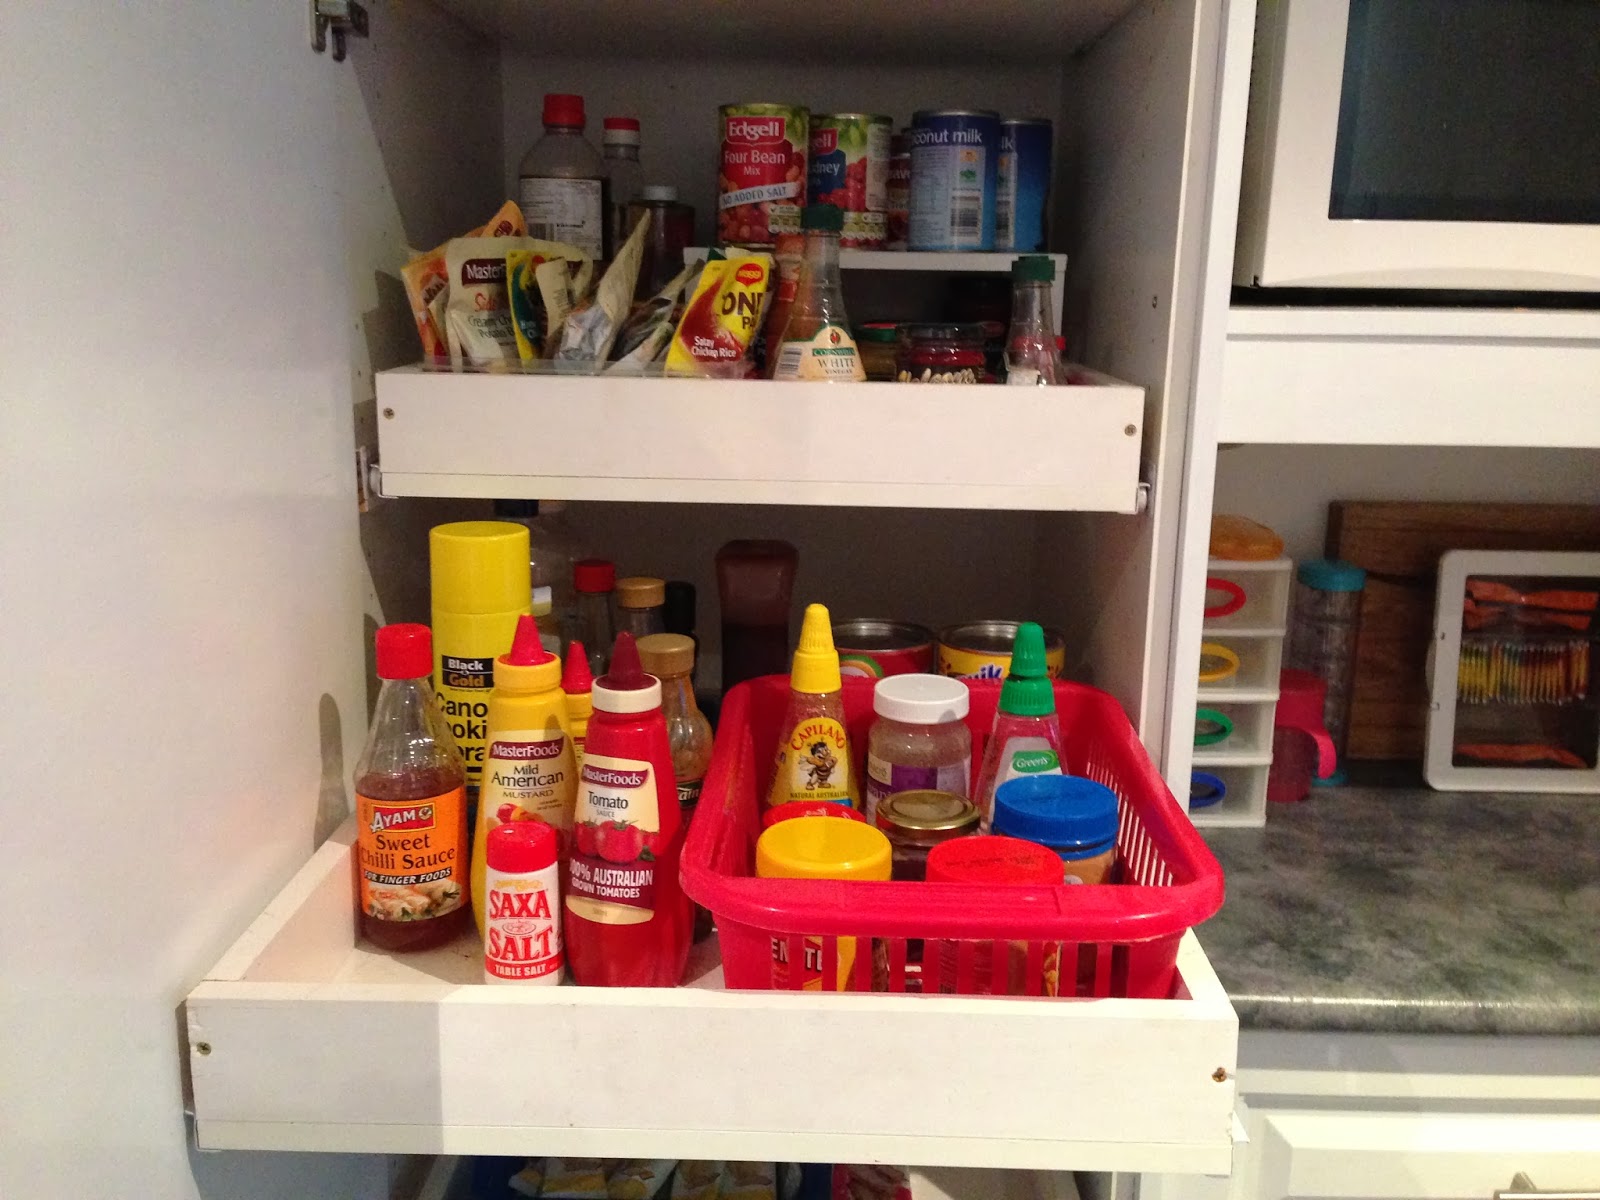
The 5 drawers (from the bottom) are all pull out drawers and we left the top two as they were. That space is for items we don't use often as I can't even reach them standing on a chair! The bottom drawer is made out of a thicker timber (and I still need to paint it!) FYI - if you do not have a magnetic knife strip thingie then do yourself a favour and get one! They are fantastic, quick and easy to find which knife you want and gives you extra space on your kitchen table top (and we all need more of that!)

THINGS THAT HELP ME STAY ORGANISED IN THE PANTRY
1. If you have a space like mine, get a pull out drawer. They will change your life and ultimately save you money as you know what you have and have easy access.

2. Group items into categories and place them into baskets. This way everything is right where you want it at all times and everyone knows where they belong. The above picture shows all sauces and oils on the left and in the red basket on the right are all condiments. Below is another example where all the packet mix products are upright in their own basket where they are secure and easy to flick through to find what you are looking for.

3. If you have a young child I find it easy to have a 'kid drawer'. Here I know all her snacks are here so I can grab them quick as I head out the door.

4. I try to unbox as much as I can and place into a basket or container so I know how many I have left. It is a pet hate of mine when you go to grab something out of a box to find it empty! Grrrr...

5. Get yourself a tiered stand. Best invention ever!! These little babies give you twice as much room in your pantry and you can see everything so much better. Perfect for cans as you can see in the picture below. You can buy them quite cheap from $2.00 shops (they are not quite $2 but what is nowadays!) FYI - they are also fantastic to use on you home or office desk!

6. If you haven't already, get yourself a labeller. I think my husband thinks it's surgically attached to my arm at times. It not only helps you to keep organised but also the other members of your family. You may know where things belong, but when you label it EVERYONE knows! Less work for you and no excuses from them :-)

So there is a look into my kitchen pantry and how I organise things. Nothing 'world-first' about it all by any means, but it's what is working for us at the moment. If you have any tips on how you organise your pantry please leave them in the comments below as I am always on the lookout for better ways to organise myself!

I hope you are all having a great day!

Jen

Sunday, 19 January 2014

2014 Goals layout for my Filofax

I have never been a great New Years Resolution keeper. I would do the typical super keen for ten minutes thing then fall back into old routines and habits but now with the added guilt of not doing what I set out to do and feeling like a failure.
So for this year I thought about goals I really could achieve and tools I could implement to really help with these goals and this is what I came up with.
I created a new tabbed section in the back of my Filofax labelled (you guessed it, GOALS). I have a cover page where I have 4 spaces for 4 different (and achievable) goals that are important to me. Below those sections are 4 sub sections to help nut out those goals. Again I made 4 goals with 4 sub sections only so I didn't spread myself too thin and fail before I even begun.


Then my goals are broken down into months. Small achievable tasks in the areas of: Health, Relationships, Finances, Personal Development, Organisation and Travel & Experiences. I only put 1-2 mini goals in each area. I also include a calendar where I can plot when I can do some of these tasks, counting down days, ticking down the days etc.


I check on my goals each week to make sure I am keeping on track and use these lists to keep me motivated and accountable. So far so good (I have usually given up by now) :-)
I will review this system in a blog mid year to let you know how I am going and whether these templates have helped my goal keeping.

I hope you are all having a great start to the year and as always if you have any questions or comments please feel free to leave a comment below and I'll get back to you.

Enjoy your week!

Jen

Sunday, 5 January 2014

Project Management System (filofax series)

Happy New Year everyone!
In this post I will be talking about one of my New Year's resolutions... Project Management. Do you ever have all these awesome ideas to fix up your house or make an awesome craft you saw on Pinterest but find it hard to schedule it all in and life just gets in the way? My biggest problem was getting super excited and starting all these different projects then getting overwhelmed because I took on too much too quickly and so abandoned them all vowing to pick it up again 'one day'...
Well this is my solution to my project abandonment issues - my Filofax Project Management System. Before I categorise everything (because that is what perfectionist me likes to do - attempt to create order), I use a 'brain dump' system. I love that name because I literately dump everything from my brain relating to projects I want to do onto the paper in any order. This brain dump is my 'Master To-Do List' and I just write it on the standard Filofax 'To Do' paper.

Once I have done this I can glance through it and work out what projects I want to be done sooner and what projects I can postpone until later in the year and I break it all down into monthly tasks. This format gets it all clear in my mind and helps me to prepare and break everything into manageable pieces.


* REMEMBER: This is a working document, meaning none of these timelines need to be set in concrete. This Project Management System is to help you do just that - manage projects. You most likely will need to alter the timeline as things pop up in your life. Don't let this stress you out or add pressure to your life, just simply move it to the next month. :-)

Once I have done this I then take 2-3 of the current month projects (no more than that or you will overwhelm yourself!!) and create tabbed sections for those projects in the next section of the Filofax. Here the task is 'nutted out' and broken up into mini to-dos and weekly tasks (if applicable).
Below is an example of some of my projects. The tabs marked ML V (mummylifestyle vlog), OL V (organisedlifestyle vlog) and OL B (organised lifestyle blog) are permanent tabs which house my You Tube and Blog pages and are separate from the regular projects. I included these just to show you if you were interested :-)


 Once each 'mini project' is complete you can tick off the boxes (my guilty pleasure!) until they are all complete and the project is done. I then remove the project and house it in a separate folder for reference. (I have a Kikki-K A5 planner headed my way in the post and will house past projects in there when I'm done).

So, that's how I do it. For more detailed projects (like preparation for Christmas etc.) I add a few more steps. Once my new (to me) planner arrives I will post a detailed blog about how I planned for Christmas Day and all the preparation that came before it.

Just remember, projects are suppose to be fun NOT stressful. Don't try and tackle everything at once. Lay it all out, break it up into manageable pieces and give yourself realistic timelines to complete in order to succeed.

GOOD LUCK and have an amazing week!!

Jen

Sunday, 15 December 2013

A Peek into my A5 Home Management Binder System

Happy 2 weeks till Christmas 2013 everyone! What a crazy year it has been with a chocka block few weeks to go - thank GOODNESS for my home management binder system or I would be running around like a crazy person (more than usual anyway) :-)
In this blog post I'm going to give you a quick look into my home management system (aka my home bible) and show you the system that works for me. I could not find any pre-make inserts that work for my lifestyle so I created them myself! (which I will link for you further down). It is really important that you find a system that works for you, otherwise, no matter how 'pretty' it looks is is not functional for you and will not be a useful tool in your organisational process. Trial and error works for me. I tend to know in about 2-3 weeks if a template layout works for me or not. If not, I try something else.
I hope this post will give you some ideas in creating your own FUNCTIONAL Home Management system.

Here is my lovely $5 A5 Domino Filofax in burgundy (not my favourite colour but for a $5 bargain price at my local Officeworks how could I pass it up!)

When you open it up you find card slots on the left and a top opening envelope on the right. On the left I store my smily face paper binder clip along with my various sized Kikki.K post it notes and my very favourite post it notes, the super-sticky Post-It brand lined in the square and large rectangle size. The larger rectangle sized post-its (blue in this picture) are perfect for housing my grocery list as once I have written it up I stick it straight onto the trolley handle in the supermarket for easy access and it doesn't fall off!
On the right, the top opening envelope (which came with the Filofax) stores my repositionable flags (which I use for my menu planning), Post-It flags, Martha Stewart re-positionable dew drops (I LOVE THESE THINGS), my K-Mart coloured dots (which I use to colour code my calendar), scrap writing paper from Kikki.K and spare menu planners (I will explain how this works later).
The pens I use are my Frixion clicker pen (Officeworks AUD $4.00 approx. - purple one is shown here). I love these pens as they are smooth and neat to write with and are also erasable which comes in very handy. On the left I use a blue Paper Mate clicker pen to write on my page flags and sticker dots.

Turn the page and you are hit with a picture that always makes me smile, my gorgeous cheeky monkey daughter. :-) The picture is protected behind a flyleaf decorated with washi tape.

Next is a key to my colour coding system for my diary section of the planner. I use the same colour coding system for my Personal Malden wallet/planner system (detailed in a previous post). The key is self explanatory (red - money out, green - money in, yellow - birthdays, blue - appointments and work schedule) and works wonderfully for me as I enjoy the colour coding system but hate carrying multiple pens around so this is a fast and effective way to colour code (plus the stickers are AUD$1.50 for a pack of 5 sheets from KMart - score!)

I use this binder clip (from eBay for AUD$1.99) to corral all my previous calendar pages together.

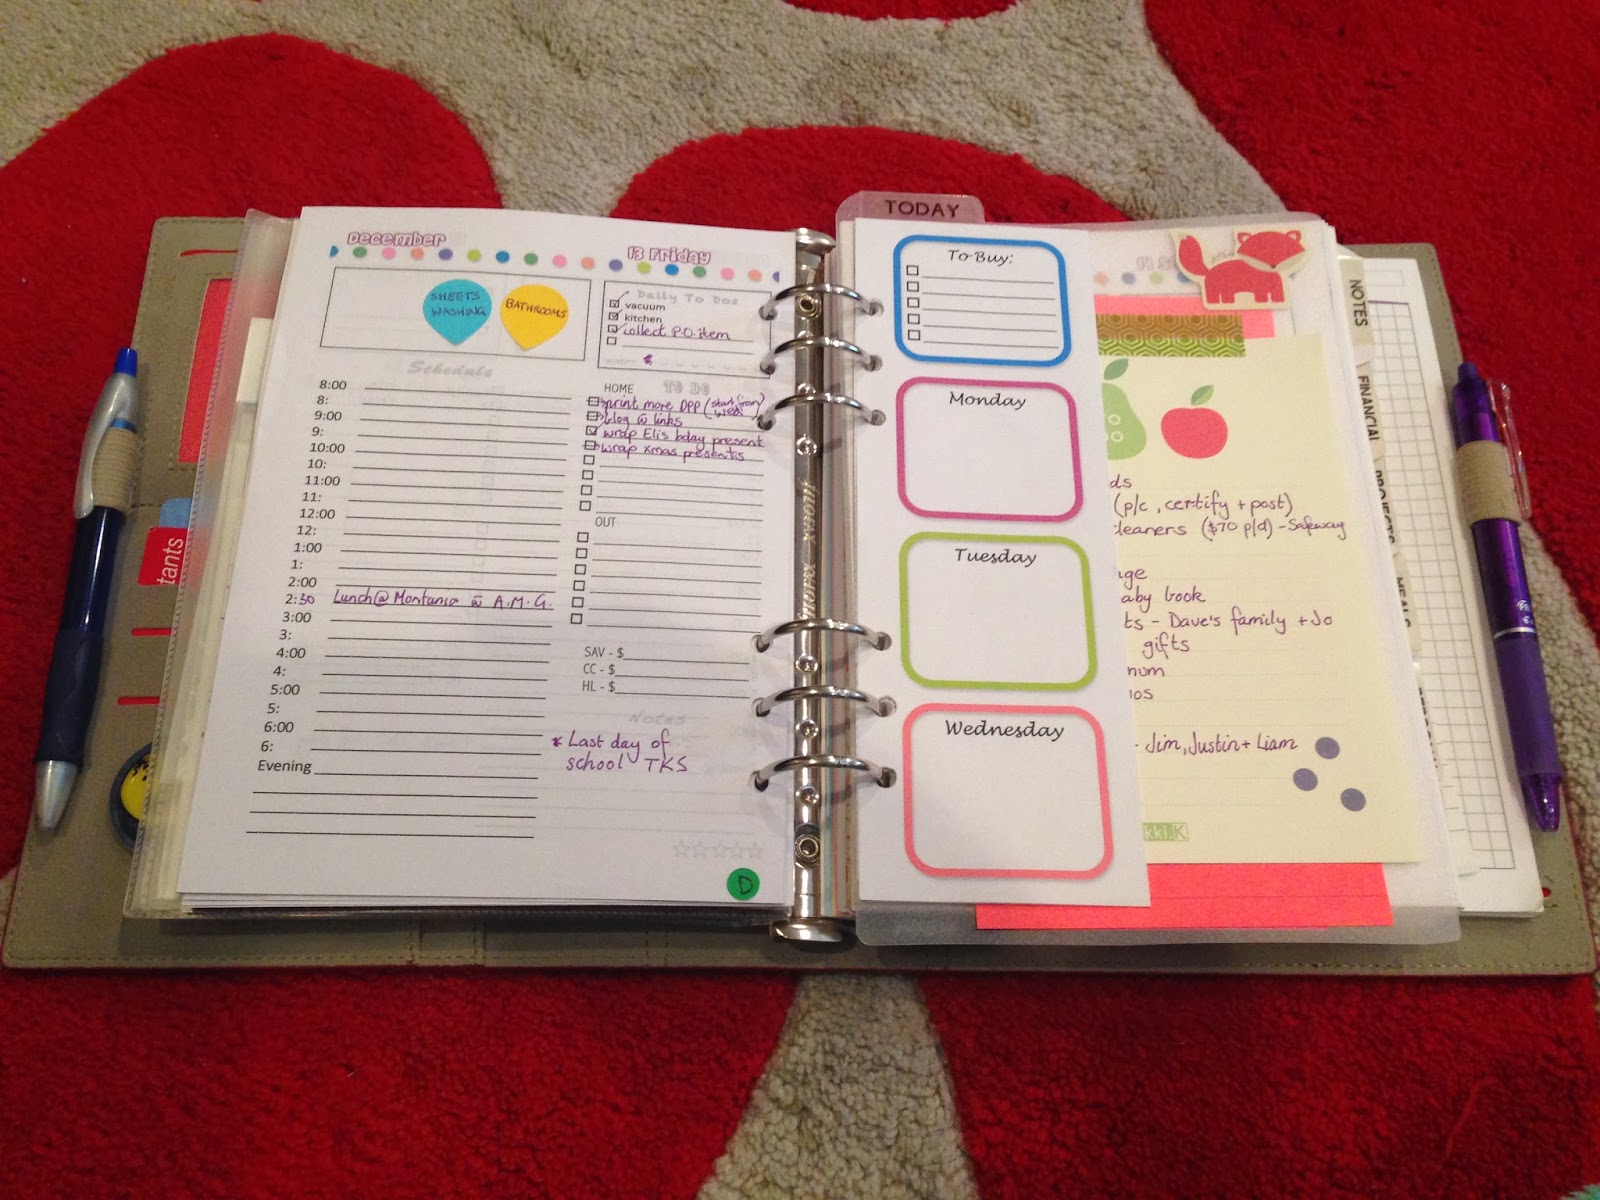
Then comes the heart of the planner, my Day per Page calendar. I could not find the perfect Day per Page insert for my lifestyle so I created my own. Here is a working example of how I use it on a daily basis as well as a blank copy: (LINK TO MY DPP TEMPLATE)
The top left box are where I house my regular chores. I write my weekly chores on my Martha Stewart dew drop stickers and place them on the day I think I will do them. But my favourite part of this system is it's flexibility. Sometimes the day gets away with you and you may run out of time to do all the chores you planned (or you just kinda can't be bothered!) With this system you can move the stickers to the following day if you don't complete them. Or alternatively you may have a quiet day and could fit more in and re-schedule your next day. This system works perfectly for me as it is extremely flexible yet still keeps me accountable to get things done.
The top right box houses my 'Daily To-Dos'. This is my I MUST DO today section, along with the all important tick boxes (so satisfying!) as well as a water intake chart to mark off my daily water intake (I am hopeless at this and using this tool to help keep me accountable).
The schedule is down the left which is broken into the hour and a blank section between each hour for appointments at different times. On the right are my regular 'Daily to dos' split into two sections to keep everything organised and easy to see. They are 'Home' for jobs to do at home and 'Out' for jobs that need to be done out and about.
Below that is my banking tracker so I can track our money in our 3 different accounts. Next is a small notes section, followed by 5 small stars which I use to rank how the day has gone and helps me to reflect on the day and what has been achieved (or not achieved). Another way of holding myself accountable and also to reflect on good days.
On the righthand side is my menu planner as well as my home made flyleaf/page marker I created. Stuck to that flyleaf is a list of my weekly to-do's which is held down with washi tape. The weekly to-do's are great as they are tasks that need to be done but not on a particular day. So if I have a spare moment I just glance at the list and pick one of these tasks to complete. The To-Do pad was brought at Kikki.K.
On the flip side of my home made flyleaf/page marker I keep notes for myself as well as the Martha Stewart dew drop stickers once I am finished with them for that week.

Next are my 6 section tabs. They are: Notes, Financial, Projects, Meals, Personal and Goals.

My Notes section contains general notes, ideas and scribbles. I use it as my thinking section which then gets transferred into the relevant section when ready. It's like my information 'brain dump' :-)
My Financial section is where I store any information to do with money that I want to keep track of. I have created multiple templates which track my online shopping, finances and money repayments.
The Online Shopping Tracker helps me to remember when, where and how much I brought items online. It is a great resource for keeping track of my online purchases and to make sure all items get sent to me and nothing gets lost or forgotten about.

The Financial Tracker is ideal for knowing at a quick glance where your money is and whether it is coming in or going out.

The Repayment Tracker is great for if you have borrowed money from the bank or elsewhere and you are paying it off in increments. This form came in very handy when paying off our wedding (which is now 100% payed off - woo hoo!)

My Projects section is spilt into sub-catergories and is where I house all my home project plans and progress. The front page shows my 'Master To-Do list'. This is a list of all the projects I want done (with no due date allocated to them). Once this is complete I then allocate them to a month and then break down the month into weeks etc. This stops me from getting too overwhelmed with everything I need to do. I LOVE my projects tab and find I have been so much more productive with projects with my new setup!
I will be doing a video as well as a corresponding blog post detailing this Projects section in more detail soon if you are interested.

I then have sub categories according to the current 3 projects I have on the go at the time. Currently they are 'Christmas' (Christmas present lists and lunch menu and decor etc.), 'Backyard' (we are currently renovating the yard and adding a dog run down the back) and 'Layla's Room' (we are moving Layla into her 'big girl' room as we prepare the nursery for the new arrival in 2 months time).

Next is my Meals section. I do not enjoy cooking and meal planning is so boring and frustrating for me so I needed a system that was easy to use and effective. This works a treat for me.
Here I store dinner meals that are tried and true in our house. Recipes we enjoy go here and the list is getting bigger every day. On the left is a key explaining a colour coding system for the meal planning. Yellow - chicken, Green - beef, Orange - lamb, Blue - pork, Red - vegetarian. On the right is the list of recipes written on the correct coloured flag. There is also a 'Take-Away', 'Eat Out' and 'Left Overs' Post-It flag. The flags I use are WD Penfold brand from Officeworks for AUD$1.00 and are writable and re-positionable.

Once we have chosen out 7 meals for the week I then place them on the correct day in my meal planning template I keep between my daily pages. Again, as the tabs are re-positionable, we can chop and change the day we have those meals according to what we feel like on the day. Once the meal has been made and eaten, the meal flag then goes back into the meals section of my planner. This is a quick and easy way of meal planning in our house and takes all the thought out of the weekly shop. HURRAH!
Then comes my Personal section which currently contains my Pregnancy Weight Tracker and once baby is here my regular Weight Tracker.


The last tab my Goals section. This is still a work in process but will house my 2014 year goals in all my personal, home, business and wellbeing areas of my life. I am still developing the perfect template for this but it currently holds my thoughts and ideas in each of these areas. I am hoping this will keep me on track and so I don't get too caught up in daily life to really reflect and be held accountable.

SO - that is it in a nut shell! I hope it has given you some ideas for your planner and that you may find the templates helpful for your personal use.
If you would like to see this set up in more detail please visit my Organisedlifestyle YouTube channel at www.youtube.com/user/organisedlifestyle where I go through my Home Management System layout section by section.

Have a VERY MERRY CHRISTMAS everyone and I hope Santa is good to you!

Jen xx

Sunday, 8 December 2013

Personal wallet/planner setup

My wallet has ALWAYS been big. It housed my cash, coins, 20-something cards, receipts, coupons, pictures and any other items I felt needed to be carried around with me at the time. So when I decided to return to a lovely Filofax system as my planner, it made perfect sense to double it up as a wallet also. Less to carry around (and as an mum of 2 under 2 in March I need to carry as least amount as possible)!

I am in LOVE with my perfect little personal aqua Malden! It is a similar size to my old wallet and holds five times as much. I understand the Filofax planner/wallet combo may be too bulky for some but to me it is an organised over-packers dream...

Here is my old Kate Hill zipped wallet against my Personal Malden:


After you have finished rubbing the soft yummy leather of this little beauty (yep, told you I was obsessed) you open it up and on the left you find all my most frequest cards in the 4 card slots: My drivers licence, bank card, Medicare, Flybuys and Woolies cards. Getting the cards out of the slots is simple as the leather is soft they don't get jammed in like so many do in past wallets I've had.
There is also a zip where I keep loose coins and a pocket for cash. The very top pocket above the card slots is a place where I store my super sticky lined Post-It notes for my grocery shopping list. I use this system as I enjoy writing on lines and like to stick the list directly onto the trolley handle for easy access.


To the right is my 'brag' page where I show off my daughter and a picture of my husband and I hidden under a washi tape framed clear fly leaf that come standard with the Filofax. The pen I use in my planner is my green Frixion ball clicker pen (from Officeworks for about AUD$4.00) and my orange Stabilo Swing Cool highlighter. Both fit perfectly attached to the side of my planner. The Frixion pen is clipped onto my aqua pen holder (purchased on eBay) which has been fixed onto the back inside cover. Can I just say that I ADORE my Frixion pens! They are smooth to write with and amazingly they rub out if needed with the eraser located on the top of the pen. So handy if your day alters and you need to re-schedule, which happens to me often. I would recommend using the clicker style and not the removable cap top pens however as the pen lid can pop off in your bag and the pen goes missing. :-(

Flip the page and you will find my 'dashboard' of different sized sticky notes (Post-It pink squares from Officeworks and 2 different shaped birdie speech bubble designs from www.mochithings.com) I use these for reminders and quick notes for my planner as well as jotting down info in a hurry.


Next is the colour code system I use for my monthly and weekly planner. This system works really well for me as I can see at a quick glance what is what and I don't miss big events like birthdays and appointments. I find this system works much better for me than a colour coding pen system as I do not need to cart around multiple pen colours with me.

The first of my planners, my monthly view on 2 pages is next. This section is divided with a home made fly leaf and note tab from Avery (from The Reject Shop for $1.00) with a clear printed label from my Dymo labeller. There will be a seperate blog explaining how to make your own EASY AND CHEAP fly leaf coming soon.
In this section I note quick important dates such as pay days, mortgage due dates and birthdays. I do this for the whole year then transfer the information week by week in my weekly planner section as needed.

Then comes my week on two page planner section. This section is also divided with my home made fly leaf system. Here I put all the information I need for that week: birthdays, appointments, bills, pay days, and any other relevant information. This is my 'bible' section that keeps my life organised. Each day is separated with a Muji stamp (purchased on eBay) with small check boxes and lines where I write in my daily to-dos. I also have an additional page attached between the weekly pages displaying my weekly to-dos (paper purchased from Kikki.K and hole punched by me). I find this system to be fantastic as things I have to get done on a certain day goes into the day section and things I want done that week without a certain day in mind gets placed in the centre page so when I have a free moment I can glance at the list and pick something to do. Another tip is to use check boxes as I find this a great motivation to get the list completed. I really enjoy the satisfaction of ticking off an item once I have completed it (is that weird?!) :-)

Here is a better view of the monthly and weekly tabs as well as the hand made dividers I created to separate the weekly planner into months.

Next, I have my 'Notes' section. I used to have multiple sections here (Finances, Projects and Personal) however I found I didn't use these sections much and gave the planner unnecessary bulk which drove me nuts. (I also have an A5 Domino Filofax I use as my home management system which I use to store all that information anyway - the next blog in my series to come)
In this notes section I have a 'Master To-Do' list in which I write all the larger projects I want to do around my home and personally. I also write up ideas of future projects, and other random information as well as some extra paper storage. I also have a small pocket which currently holds my transparent stickers.
The last part in this section is my 'Wish List' which is divided into sections for each member of my family as well as a home tab. This is for when I see something out and about which I think would be great for someone or as home decor. I will write what the item is in the corresponding section along with where it is located and how much it is. This is great for prepping for birthdays and Christmas gift ideas.

The last section of my Filofax contains my Coloured Dots I use for colour coding (from K-Mart AUD$1.50) stored in the Filofax top opening envelope which came with the planner.

A press closure envelope is next which houses spare postage stamps.

The very last page is where my other cards are located including: gift vouchers and membership cards. These things I don't need to access every day so they are great tucked away in the back. I also keep petrol vouchers and important information in the back pocket of my Filofax where they don't move or flap about.

So that is a look into my Personal Malden wallet/planner setup. I love it and it works perfectly for my lifestyle. If you would like to see my You Tube video showing the above, please visit my channel Organised Lifestyle: www.youtube.com/user/organisedlifestyle or this link: http://youtu.be/0A03tKRNlTo

Stay tuned for my next blog post this week: A Look into my A5 Domino Filofax Home Management System which houses all my house management and a more detailed planner. I will also include links to the inserts I have created for this system. :-)

Have a great day!

Jen