Showing posts with label planner templates. Show all posts

Friday, 26 September 2014

My Erin Condren Flip Through

Ok, yes it's true... I am a convert!
I never would have thought it but I love the Erin Condren Life Planner. I have seen so many reviews on this planner and did not understand the hype. I didn't really like the layout with those little boxes, the headings didn't work for my life and week on two pages didn't seem enough as I was currently a day on 1 page kinda girl. But most of all I love my ring planners (Filofax and Gillio) and didn't like the coil as it's not as simple to add and remove things.
However, I had the opportunity to purchase a friend's 2014 life planner for a very decent price and I decided to give it a whirl and find out what all the fuss was about. Thus began my love affair...
It's an A5 size without the bulk of a planner so is lightweight and compact. The craftsmanship is fabulous. The coil is solid and sturdy and the pages are thick and crisp.
I love all the pops of colour, the tabbed months and the pretty covers.
After 3 weeks I am very surprised to say that the layout is working perfectly for me. I have all the space I need and I love to be able to see everything at a glance.
The only thing I didn't like were the headings so I created sticker strips to place on top of the old ones replacing morning/schedule, day/to dos and night/notes. It works great and looks fantastic (if I do say so myself!)


Here is how I have been using my Life Planner


I am really enjoying customising the planner too. A few decorative stickers here and there but mostly everything has a purpose. I can't have my planner too 'busy' with decoration or my information gets 'lost' in the prettiness.

I'm loving using stamps and stickers to help me to organise.

The planner stamps I am using are:
StudioL2e - www.studiol2e.com
Tiny Stamps, Big Plans - https://www.etsy.com/au/shop/TinyStampsBigPlans

Here are some of the stickers I made:


I also tried my hand at making a cover. It's ok, but will do better next time! It's currently got a Kikki-K planner band around it. The band is great as it not only keeps everything together, but can store 2 pens in the stretchy loops.


Overall I am really enjoying this planner. I am using my Gillio still but now it functions as a wallet with notes, financials, social media and my tracker.

I will be placing an order for my new 2015 planner next week (with a few other goodies I will share soon!)

Click HERE to view my corresponding video to this blog post :-)

Have a great day,

Jen

Thursday, 14 August 2014

Personal Inserts 2014

Wow, what a crazy few days!
I would just like to publicly thank everyone for all your comments and kind words regarding my inserts. I have drawn inspiration from DIYFish, Philofaxy and Life Is Crafted. Each are fantastic in their own right, but not 100% right for me, so I created my own. I am NOT a professional on the computer by any means but am really happy with the system I have come up with.
I love my A5 setup but I have a new baby on its way to me - a medium GILLIO MIA CARA! (excitement plus!) so I needed to make the personal inserts to fit 'her'.

This is the result...


My dailies are very similar to the A5, just a shrunk down version. I still have my 8am-8pm time slot with the time gaps in between each hour, as well as my To-Dos HOME and OUT sections, Notes and Washing check boxes. There is also a section to write the date, day and month.


The generic version I will have online looks like this:


The only difference between mine and the generic styles is that mine has my washing schedule on it and the generic is blank for you to fill in what you wish.


The Menu/Weekly is a little different as the 'Ingredients' section is missing in the personal size as I found there wasn't enough room for it here. (If you'd like to see my menu planning video click HERE). There is also a weekly section at a glance like the A5 version for writing a quick 'what's on' for during the week. The other side contains notes. I have also added grid boxes to use how you wish. The second picture below show how it looks printed from A4 paper


Flip the Weekly/Menu portion over and you will find the Weekly To-Dos/Tracker list. I love this section. It's everything you need to find at a glance. No flipping here, there and everywhere to find your lists.


As you can see, my page has an 'OrganisedLifestyle' tracker section. You obviously don't need that so I have simply removed that portion and added more to-dos instead.


Below you will see how the Weekly To-Do/Tracker prints on A4 paper. This side has a feint grey box outline to use as cutting lines to cut the page to size.


So, that's it in a nutshell! I LOVE my new system. Its compact and easy to use. Everything has a place while also appealing to look at.
If you would like to see the video on how I use the personal inserts , click HERE.
If you would like to see the video on the A5 inserts, click HERE

If you decide to give these inserts a try please let me know what you think of them :-)
And please remember, only use these inserts for personal use and do not sell them.

Enjoy!

GENERIC Day On One Page Personal Insert HERE

GENERIC Weekly Insert HERE

Wednesday, 6 August 2014

My current setup and inserts in my A5 - August 2014

Hi guys!

This blog has been a while in the making...

I love my planner. I love being organised. I love decorating and I love pretty things. But recently I have spent so much time decorating, planning and organising that I ran out of time to actually DO any of the things IN my planner!! :-(

I have used Life is Crafted inserts and enjoyed them but I missed seeing my week at a glance in the one planner.
I loved my DIYfish inserts. I felt I had the best of both worlds. Detailed daily pages while still being able to see my weeklies. There was even a section for monthly/weekly To Dos and a place to put my menu planning system (see menu planning video HERE). I soon discovered I never used the monthly/weekly To Dos as I hated flipping back and forth (If it's not in my immediate view, I forget about it). And I was also using the DO2P which I LOVED at first. It looked so pretty decorated and inspired me to use my planner. I even journalled in there too! But all this took up so much time. I found that as I was time poor, I spent all my time planning and decorating and I ran out of time doing the tasks the planner demanded of me!


So I tried not decorating for a while to see if I could utilise my time this way. COMPLETE FAIL! It's funny but I didn't even look at my planner on those days as it wasn't pretty enough to write in!! (hang my head in shame) ;-) I can't explain it but if my pages weren't visually appealing at all then I wasn't motivated enough to write in it.


I also tried the free philofaxy DO1P inserts. They worked great and were the perfect amount of writing space. But that too was lacking 'something'...

So, I decided to go back to my old planner pages I created earlier but tweaked them with things I liked from other inserts I tried, tips I got from others or ideas I discovered for myself. And I am LOVING them!!

Day On 1 Page 


Here is my weekly DO1P (undated). I love the pop of colour it gives without having to add washi everywhere. I love the 8am-6pm schedule, the 'all day' section up the top and the ability to edit the time where appropriate.
I love my dinner section. This is a time saver. I was always cutting washi arrows to achieve the same decorative effect.
I always break my To Dos up into HOME and OUT categories as I find it much more organised and it helps me to plan out my day.

My favourite part is the washing section (not in the generic version).


I do mounds of washing as I have 2 kids under 2 both in cloth nappies, as well as kids clothes, adults and towels and sheets washing. This washing check list really helps me. The triangles get shaded in for what washing needs to get done that day. The square boxes are for ticking off when it's completed (and you all know I love a good check box!)

Week View / Menu Planning


I really love this section as it is such an asset to my planning system. I loved DIYfish's concept of flipping out the weekly section so you can view it all easily. I took this idea further by adding my menu planning also, so it's right there at my fingertips. No more flipping around. It's all there in front of me. It reminds me of what we are having for tea, what I need to de-frost, buy etc.
I also love the colour system. I'm a visual person so I need to see things in colour to make it stick in my brain.

Weekly To Dos / Tracker


This is an easy to access weekly check list of To Dos and Tracking. I LOVE this section as it has really helped me plan out my week and track things that are important to me. It also helps me to track my OrganisedLifestyle YT and Blog as it is right there and easy to read (again, very visual). The generic weekly inserts do not include the YT/blog tracker.

This whole system is really working for me as I no longer feel distracted by continual planning or decorating. I still enjoy decorating my pages but now I only add accents here and there which takes only minutes.

Now, I am by no means an expert on designing inserts but since they are working so well for me I'd love to share them with you.
These are FREE undated PDF templates for A5 (you need to print 2 to a page) The links are below. Please use and enjoy them and leave me some feedback on what you think.

* For personal use only. Do not sell these inserts.

Have a great week!

Jen :-)

PS. A YouTube video on how I use these inserts will be up soon!


Day On 1 Page inserts HERE - (Print: 2 per page to make A5 size)

Weekly To Dos/Tracker inserts HERE - (Print: 2 per page layout 2-1 (blank on left, insert on right)
* (NEW) WEEKLY TO DOS/TRACKER GRID VERSION HERE

Weekly View/Menu inserts HERE - (Print: 2 per page layoit 1-2 (insert on left. blank on right)
* (NEW) WEEKLY TO DOS/TRACKER GRID VERSION HERE

Sunday, 19 January 2014

2014 Goals layout for my Filofax

I have never been a great New Years Resolution keeper. I would do the typical super keen for ten minutes thing then fall back into old routines and habits but now with the added guilt of not doing what I set out to do and feeling like a failure.
So for this year I thought about goals I really could achieve and tools I could implement to really help with these goals and this is what I came up with.
I created a new tabbed section in the back of my Filofax labelled (you guessed it, GOALS). I have a cover page where I have 4 spaces for 4 different (and achievable) goals that are important to me. Below those sections are 4 sub sections to help nut out those goals. Again I made 4 goals with 4 sub sections only so I didn't spread myself too thin and fail before I even begun.


Then my goals are broken down into months. Small achievable tasks in the areas of: Health, Relationships, Finances, Personal Development, Organisation and Travel & Experiences. I only put 1-2 mini goals in each area. I also include a calendar where I can plot when I can do some of these tasks, counting down days, ticking down the days etc.


I check on my goals each week to make sure I am keeping on track and use these lists to keep me motivated and accountable. So far so good (I have usually given up by now) :-)
I will review this system in a blog mid year to let you know how I am going and whether these templates have helped my goal keeping.

I hope you are all having a great start to the year and as always if you have any questions or comments please feel free to leave a comment below and I'll get back to you.

Enjoy your week!

Jen

Sunday, 5 January 2014

Project Management System (filofax series)

Happy New Year everyone!
In this post I will be talking about one of my New Year's resolutions... Project Management. Do you ever have all these awesome ideas to fix up your house or make an awesome craft you saw on Pinterest but find it hard to schedule it all in and life just gets in the way? My biggest problem was getting super excited and starting all these different projects then getting overwhelmed because I took on too much too quickly and so abandoned them all vowing to pick it up again 'one day'...
Well this is my solution to my project abandonment issues - my Filofax Project Management System. Before I categorise everything (because that is what perfectionist me likes to do - attempt to create order), I use a 'brain dump' system. I love that name because I literately dump everything from my brain relating to projects I want to do onto the paper in any order. This brain dump is my 'Master To-Do List' and I just write it on the standard Filofax 'To Do' paper.

Once I have done this I can glance through it and work out what projects I want to be done sooner and what projects I can postpone until later in the year and I break it all down into monthly tasks. This format gets it all clear in my mind and helps me to prepare and break everything into manageable pieces.


* REMEMBER: This is a working document, meaning none of these timelines need to be set in concrete. This Project Management System is to help you do just that - manage projects. You most likely will need to alter the timeline as things pop up in your life. Don't let this stress you out or add pressure to your life, just simply move it to the next month. :-)

Once I have done this I then take 2-3 of the current month projects (no more than that or you will overwhelm yourself!!) and create tabbed sections for those projects in the next section of the Filofax. Here the task is 'nutted out' and broken up into mini to-dos and weekly tasks (if applicable).
Below is an example of some of my projects. The tabs marked ML V (mummylifestyle vlog), OL V (organisedlifestyle vlog) and OL B (organised lifestyle blog) are permanent tabs which house my You Tube and Blog pages and are separate from the regular projects. I included these just to show you if you were interested :-)


 Once each 'mini project' is complete you can tick off the boxes (my guilty pleasure!) until they are all complete and the project is done. I then remove the project and house it in a separate folder for reference. (I have a Kikki-K A5 planner headed my way in the post and will house past projects in there when I'm done).

So, that's how I do it. For more detailed projects (like preparation for Christmas etc.) I add a few more steps. Once my new (to me) planner arrives I will post a detailed blog about how I planned for Christmas Day and all the preparation that came before it.

Just remember, projects are suppose to be fun NOT stressful. Don't try and tackle everything at once. Lay it all out, break it up into manageable pieces and give yourself realistic timelines to complete in order to succeed.

GOOD LUCK and have an amazing week!!

Jen

Sunday, 15 December 2013

A Peek into my A5 Home Management Binder System

Happy 2 weeks till Christmas 2013 everyone! What a crazy year it has been with a chocka block few weeks to go - thank GOODNESS for my home management binder system or I would be running around like a crazy person (more than usual anyway) :-)
In this blog post I'm going to give you a quick look into my home management system (aka my home bible) and show you the system that works for me. I could not find any pre-make inserts that work for my lifestyle so I created them myself! (which I will link for you further down). It is really important that you find a system that works for you, otherwise, no matter how 'pretty' it looks is is not functional for you and will not be a useful tool in your organisational process. Trial and error works for me. I tend to know in about 2-3 weeks if a template layout works for me or not. If not, I try something else.
I hope this post will give you some ideas in creating your own FUNCTIONAL Home Management system.

Here is my lovely $5 A5 Domino Filofax in burgundy (not my favourite colour but for a $5 bargain price at my local Officeworks how could I pass it up!)

When you open it up you find card slots on the left and a top opening envelope on the right. On the left I store my smily face paper binder clip along with my various sized Kikki.K post it notes and my very favourite post it notes, the super-sticky Post-It brand lined in the square and large rectangle size. The larger rectangle sized post-its (blue in this picture) are perfect for housing my grocery list as once I have written it up I stick it straight onto the trolley handle in the supermarket for easy access and it doesn't fall off!
On the right, the top opening envelope (which came with the Filofax) stores my repositionable flags (which I use for my menu planning), Post-It flags, Martha Stewart re-positionable dew drops (I LOVE THESE THINGS), my K-Mart coloured dots (which I use to colour code my calendar), scrap writing paper from Kikki.K and spare menu planners (I will explain how this works later).
The pens I use are my Frixion clicker pen (Officeworks AUD $4.00 approx. - purple one is shown here). I love these pens as they are smooth and neat to write with and are also erasable which comes in very handy. On the left I use a blue Paper Mate clicker pen to write on my page flags and sticker dots.

Turn the page and you are hit with a picture that always makes me smile, my gorgeous cheeky monkey daughter. :-) The picture is protected behind a flyleaf decorated with washi tape.

Next is a key to my colour coding system for my diary section of the planner. I use the same colour coding system for my Personal Malden wallet/planner system (detailed in a previous post). The key is self explanatory (red - money out, green - money in, yellow - birthdays, blue - appointments and work schedule) and works wonderfully for me as I enjoy the colour coding system but hate carrying multiple pens around so this is a fast and effective way to colour code (plus the stickers are AUD$1.50 for a pack of 5 sheets from KMart - score!)

I use this binder clip (from eBay for AUD$1.99) to corral all my previous calendar pages together.

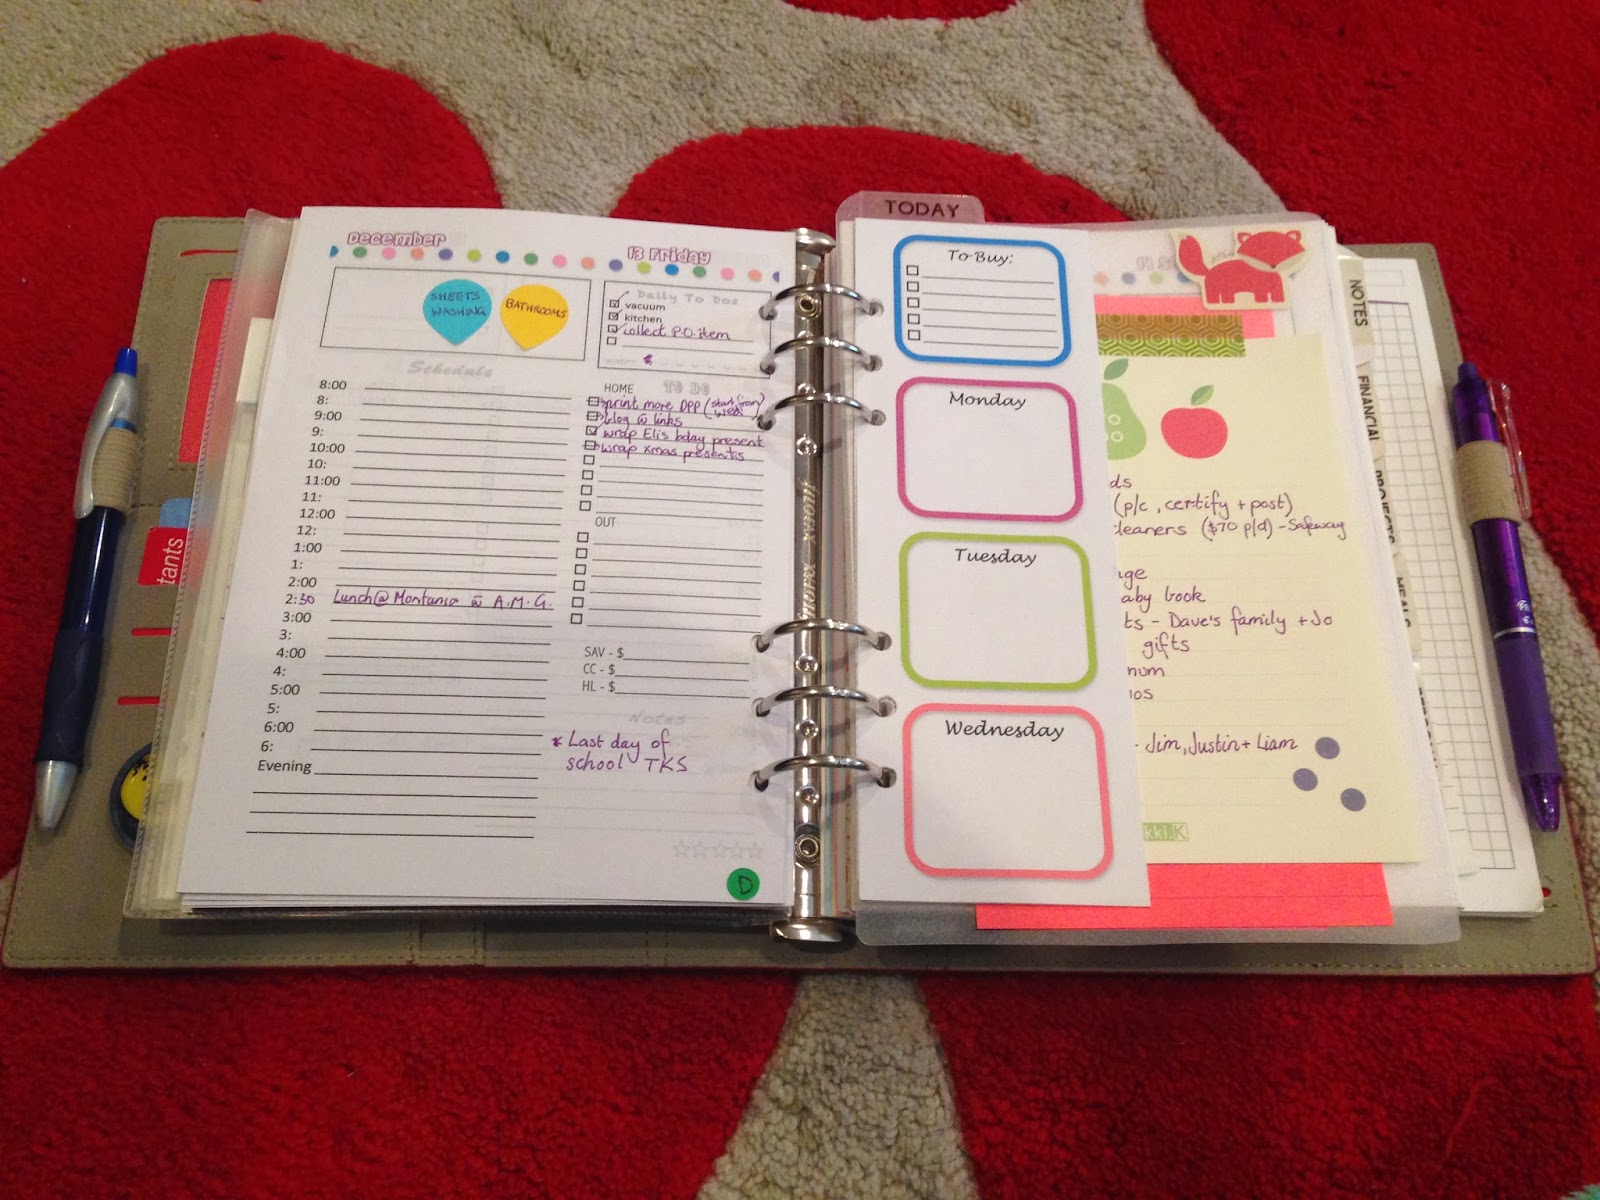
Then comes the heart of the planner, my Day per Page calendar. I could not find the perfect Day per Page insert for my lifestyle so I created my own. Here is a working example of how I use it on a daily basis as well as a blank copy: (LINK TO MY DPP TEMPLATE)
The top left box are where I house my regular chores. I write my weekly chores on my Martha Stewart dew drop stickers and place them on the day I think I will do them. But my favourite part of this system is it's flexibility. Sometimes the day gets away with you and you may run out of time to do all the chores you planned (or you just kinda can't be bothered!) With this system you can move the stickers to the following day if you don't complete them. Or alternatively you may have a quiet day and could fit more in and re-schedule your next day. This system works perfectly for me as it is extremely flexible yet still keeps me accountable to get things done.
The top right box houses my 'Daily To-Dos'. This is my I MUST DO today section, along with the all important tick boxes (so satisfying!) as well as a water intake chart to mark off my daily water intake (I am hopeless at this and using this tool to help keep me accountable).
The schedule is down the left which is broken into the hour and a blank section between each hour for appointments at different times. On the right are my regular 'Daily to dos' split into two sections to keep everything organised and easy to see. They are 'Home' for jobs to do at home and 'Out' for jobs that need to be done out and about.
Below that is my banking tracker so I can track our money in our 3 different accounts. Next is a small notes section, followed by 5 small stars which I use to rank how the day has gone and helps me to reflect on the day and what has been achieved (or not achieved). Another way of holding myself accountable and also to reflect on good days.
On the righthand side is my menu planner as well as my home made flyleaf/page marker I created. Stuck to that flyleaf is a list of my weekly to-do's which is held down with washi tape. The weekly to-do's are great as they are tasks that need to be done but not on a particular day. So if I have a spare moment I just glance at the list and pick one of these tasks to complete. The To-Do pad was brought at Kikki.K.
On the flip side of my home made flyleaf/page marker I keep notes for myself as well as the Martha Stewart dew drop stickers once I am finished with them for that week.

Next are my 6 section tabs. They are: Notes, Financial, Projects, Meals, Personal and Goals.

My Notes section contains general notes, ideas and scribbles. I use it as my thinking section which then gets transferred into the relevant section when ready. It's like my information 'brain dump' :-)
My Financial section is where I store any information to do with money that I want to keep track of. I have created multiple templates which track my online shopping, finances and money repayments.
The Online Shopping Tracker helps me to remember when, where and how much I brought items online. It is a great resource for keeping track of my online purchases and to make sure all items get sent to me and nothing gets lost or forgotten about.

The Financial Tracker is ideal for knowing at a quick glance where your money is and whether it is coming in or going out.

The Repayment Tracker is great for if you have borrowed money from the bank or elsewhere and you are paying it off in increments. This form came in very handy when paying off our wedding (which is now 100% payed off - woo hoo!)

My Projects section is spilt into sub-catergories and is where I house all my home project plans and progress. The front page shows my 'Master To-Do list'. This is a list of all the projects I want done (with no due date allocated to them). Once this is complete I then allocate them to a month and then break down the month into weeks etc. This stops me from getting too overwhelmed with everything I need to do. I LOVE my projects tab and find I have been so much more productive with projects with my new setup!
I will be doing a video as well as a corresponding blog post detailing this Projects section in more detail soon if you are interested.

I then have sub categories according to the current 3 projects I have on the go at the time. Currently they are 'Christmas' (Christmas present lists and lunch menu and decor etc.), 'Backyard' (we are currently renovating the yard and adding a dog run down the back) and 'Layla's Room' (we are moving Layla into her 'big girl' room as we prepare the nursery for the new arrival in 2 months time).

Next is my Meals section. I do not enjoy cooking and meal planning is so boring and frustrating for me so I needed a system that was easy to use and effective. This works a treat for me.
Here I store dinner meals that are tried and true in our house. Recipes we enjoy go here and the list is getting bigger every day. On the left is a key explaining a colour coding system for the meal planning. Yellow - chicken, Green - beef, Orange - lamb, Blue - pork, Red - vegetarian. On the right is the list of recipes written on the correct coloured flag. There is also a 'Take-Away', 'Eat Out' and 'Left Overs' Post-It flag. The flags I use are WD Penfold brand from Officeworks for AUD$1.00 and are writable and re-positionable.

Once we have chosen out 7 meals for the week I then place them on the correct day in my meal planning template I keep between my daily pages. Again, as the tabs are re-positionable, we can chop and change the day we have those meals according to what we feel like on the day. Once the meal has been made and eaten, the meal flag then goes back into the meals section of my planner. This is a quick and easy way of meal planning in our house and takes all the thought out of the weekly shop. HURRAH!
Then comes my Personal section which currently contains my Pregnancy Weight Tracker and once baby is here my regular Weight Tracker.


The last tab my Goals section. This is still a work in process but will house my 2014 year goals in all my personal, home, business and wellbeing areas of my life. I am still developing the perfect template for this but it currently holds my thoughts and ideas in each of these areas. I am hoping this will keep me on track and so I don't get too caught up in daily life to really reflect and be held accountable.

SO - that is it in a nut shell! I hope it has given you some ideas for your planner and that you may find the templates helpful for your personal use.
If you would like to see this set up in more detail please visit my Organisedlifestyle YouTube channel at www.youtube.com/user/organisedlifestyle where I go through my Home Management System layout section by section.

Have a VERY MERRY CHRISTMAS everyone and I hope Santa is good to you!

Jen xx