Hi Everyone!
One of my favourite YouTubers is Katherine from Do It On A Dime. She is a real down-to-earth home owner who comes up with cheap, classy and creative ways to organise your home 'on a dime'.
The downside is that she is American so all the awesome stores she buys from (Target's dollar store, Dollar Tree, Container Store etc.) we don't have here in Australia. Can you believe they have $1 stores where items are... wait for it... $1!!!??? Last week I went to a $1 store and picked up an item that was $23.95! I gently put it down and walked away. BUT I digress :-)
Katherine created a YouTube TAG called 'The Organised Cheap Life' where she asked 3 simple questions and shared her answers. The link to her video is HERE.
I loved the video and found it really useful, so I decided to do it too! HERE is the link to my video.
1. Name 2 new organisers you are loving at the moment:
i) My Filofaxes - My personal Ochre Malden is beautiful and so helpful! I use it as my wallet/organiser. I LOVE it. Perfect setup for me and perfect size.
My A5 Aqua Malden is my Home Management 'bible' where I keep everything. I would be lost without it. It holds everything from appointments and chores to quotes, journalling and vlog/blog ideas.
ii) My 'What's On' Wall Planner - The perfect simple organiser for the family. I just write all important information and appointments for the family over the following 2 weeks on there and at a quick glance we can all see what is going on. Even hubby knows how to use it ;-)
iii) I was naughty and added one more item - My Orla Kiely organiser. I ordered this beauty from eBay (as Australia doesn't have a groovy Target like the States do). I have only had it a few days but I think I'm in LOVE! My video on this organiser will be up shortly to show how I am currently using it.
2. Name 2 cheap sale items that you love:
i) My Smash Nude Food containers. I purchased this on a sale from Coles supermarket for $2 and it is so handy and versatile! I use it for everything from my toddlers sultanas, fruit and other snacks to my hair ties and bobby pins (PS - it holds 4-5 rolls of washi tape perfectly!!)
ii) My daughter's green chair. I love this mini couch chair. It's perfect for lounging, sitting like a 'big girl' watching telly and is the only place (other than the high chair) where I can get her to sit down to eat - she like to constantly be on the move!! She's my little whirlwind :-) The best bit, it was only $10! We brought it secondhand off Gumtree (like Craigs List in the States?) I love Gumtree as you can get some real local bargains. Selling things on there is fantastic too because unlike eBay, they don't take a cut of the profit - it's totally FREE to post and sell!
3. Name 2 life improvement items that are working for you:
i) My DIYfish inserts - These have seriously changed my life for the better. I love the style, the layout, the price (and the fact that my friend prints, cuts and folds them for me!) If you are interested in these inserts please feel free to check out my video review HERE.
ii) My toy storage/rotation system - My lounge room no longer looks like a toy minefield and my daughter gets to play with and enjoy all her toys at different times. To learn more about my setup visit my video HERE.
So there it is, my Do It On A Dime TAG for an Organised Cheap Life :-)
I hope you enjoyed and if you would like to take part in this tag please comment below or on my corresponding YouTube video as I'd love to check out your favourite organisation items!
Have a great day!
Jen
Find Me:
YouTube:
www.youtube.com/user/organisedlifestyle
Blog:
www.organisedlifestyle.blogspot.com.au
Facebook: https://www.facebook.com/pages/Organi...
Instagram:
www.instagram.com/organisedlifestyle
Twitter: www.twitter.com/organiselifeJen
Thursday, 26 June 2014
Friday, 20 June 2014
Toy Rotation and Storage
Hi All!
This is a bit of a different one - still organisation related but more focussed towards mums and dads with young kids.
We have been lucky enough to have been given toys as hand me downs and as gifts to the girls for birthdays so we have many a toy in our house! As I'm fairly new to this whole 'mum thing' (my oldest is 22 months) so I wasn't sure how to introduce toys to her or which ones she'd like. So I just put them all in a basket in the lounge room and let her take what she wanted.
I learnt pretty quick that was a mistake. Not only did she bring out Every.Single.Toy in the basket and flung them across the entire lounge room (tidy freaks nightmare!) but she also got so overwhelmed with choice that she wouldn't spend time playing with a single toy. She would just jump from toy to toy to toy not really 'playing' with any of them.
My solution was to play to my strengths and organise them!
I started by splitting the toys into 4 different piles so there was only 10ish toys out at one time.
I then placed those toys in a bookshelf I found for $10 from the Salvos.
I placed the bookcase in a corner and created a 'play corner' where all the toys are corralled so at the end of the day when the kids are in bed, we can have some 'adult' space where hubby and I don't negotiate between blocks, cars and dolls.
The only 'rule' with this storage bookshelf was not to put anything except soft toys in the top shelves so she doesn't pull heavy or hard things on top of herself.
We also have a toy rotation system where every week or every other week (depending on how much she is enjoying the current selection), we rotate out the toys for one of the piles stored away.
As she has 'favourite toys for the month' we don't usually rotate out all toys at once.
Below is where we store the remaining toys not in use under the cot. As the side of the cot stays down when she is awake, they are inaccessible to prying hands :-)
The toys are stored into plastic bins I purchased for under $5 each from the Salvos. They are both made of very sturdy plastic and have wheels, making them easy to pull in and out from under the cot.
This is my favourite Ikea purchase (I also have one in my other daughter's room) These fabric baskets hold her nappies, dirty clothes, some clothes, bibs and her books.
I hope you have enjoyed this blog and again if you have any questions or comments I'd love to hear from you.
Don't forget to visit me on my YouTube channel (here) and Instagram (here)
Have a great day!
Jen
This is a bit of a different one - still organisation related but more focussed towards mums and dads with young kids.
We have been lucky enough to have been given toys as hand me downs and as gifts to the girls for birthdays so we have many a toy in our house! As I'm fairly new to this whole 'mum thing' (my oldest is 22 months) so I wasn't sure how to introduce toys to her or which ones she'd like. So I just put them all in a basket in the lounge room and let her take what she wanted.
I learnt pretty quick that was a mistake. Not only did she bring out Every.Single.Toy in the basket and flung them across the entire lounge room (tidy freaks nightmare!) but she also got so overwhelmed with choice that she wouldn't spend time playing with a single toy. She would just jump from toy to toy to toy not really 'playing' with any of them.
My solution was to play to my strengths and organise them!
I started by splitting the toys into 4 different piles so there was only 10ish toys out at one time.
I then placed those toys in a bookshelf I found for $10 from the Salvos.
I placed the bookcase in a corner and created a 'play corner' where all the toys are corralled so at the end of the day when the kids are in bed, we can have some 'adult' space where hubby and I don't negotiate between blocks, cars and dolls.
The only 'rule' with this storage bookshelf was not to put anything except soft toys in the top shelves so she doesn't pull heavy or hard things on top of herself.
We also have a toy rotation system where every week or every other week (depending on how much she is enjoying the current selection), we rotate out the toys for one of the piles stored away.
As she has 'favourite toys for the month' we don't usually rotate out all toys at once.
Below is where we store the remaining toys not in use under the cot. As the side of the cot stays down when she is awake, they are inaccessible to prying hands :-)
| Out of sight, out of mind! |
| Cot rail up |
The toys are stored into plastic bins I purchased for under $5 each from the Salvos. They are both made of very sturdy plastic and have wheels, making them easy to pull in and out from under the cot.
Above is a collapsable washing basket from Ikea where I store her pile of stuffed toys in her bedroom.
This is my favourite Ikea purchase (I also have one in my other daughter's room) These fabric baskets hold her nappies, dirty clothes, some clothes, bibs and her books.
I hope you have enjoyed this blog and again if you have any questions or comments I'd love to hear from you.
Don't forget to visit me on my YouTube channel (here) and Instagram (here)
Have a great day!
Jen
Monday, 16 June 2014
DIYfish inserts review - A5 WO2P v2.1
Well I have had a very fun and productive week and a half!
After reading so many positive comments about the DIYfish inserts I thought it may be time to give them a go. It took me a few months to build up the courage to try them though. I say 'courage' because it looked WAAAYYY complicated. Pages that open up and fold in on other pages, weeks that go vertically, monthly and weekly check lists and heaps of blank spaces. I didn't know if I'd be able to use all the sections let alone understand how they'd all fit together!
But I did it. I ordered the 3-month trial. However, I did cheat and got a lovely friend of mine from a Facebook planner group to print, cut and send them to me because I KNOW I would have gotten confused or not had the time or patience to put it all together and I would have given up! (Thank you Stephanie - you're an angel)
Once they arrived to my door, I got all excited, ripped open the packaging and my heart sunk... There were pages and pages in all shapes and sizes. I spent the first 15 minutes just staring at them thinking 'Why did I buy these?' 'How the hell am I going to put this crazy planner insert thingie together??'
But I persisted and watched a few You Tube videos to help me figure it all out. This video (here) from Nadine's Mixed Plate was a great help for understanding and ordering the inserts.
Once I figured them out I tried adding my regular information in the inserts and this is what I came up with...
Underwhelming isn't it! So then I started thinking 'What would I like to have in my planner that I couldn't add in my other inserts?' and I got to work filling out the empty spaces.
I am converted! Turns out I am now IN LOVE with these crazy DIYfish inserts! I now have everything I need all in one planner.
The left side of the Day page I use for to-do's (top-down for things to do at home and bottom-up for things to do out and about), the coloured stickers are for the washing system I use, and the section on the left is a calendar (not a lot on that day I guess!) The right side of the day page are for notes and the bottom half I use as a daily journal about my family and kids. I LOVE this. I have a filofax I used for journalling but only used it every now and again as life would get in the way and I'd forget. As my A5 planner is always open on my desk and always in use, it was much easier to remember to journal. I'm really enjoying it.
I had a good meal planning system, but this new system has made it GREAT. Below is my weekly menu plan:
I use the left side of the table to plan what I am going to make during the week. On the right is where I write all the ingredients needed for that meal. This is very helpful when prepping for my weekly grocery shop so I don't forget anything. As I have 2 young babies, going to the supermarket once a week is hard enough let alone going back a second time! Visit my meal planning video (here) to see my old system which still use the flag system.
I also write my dinner meal in my daily page:
I also enjoy the monthly tracker. I'm still feeling around with how it works and how it will work with my lifestyle. I have ideas to try for July and I will write and video an update later next month. Here it is at the moment:
I also have a section in my planner for a detailed look into my blogs and videos but I wanted to be able to view my next topic really quickly as I'm using the back of the weekly 'flap' and my quick dot point overview of my OrganisedLifestyle topic for the week to keep me on track, organised and easily accessible.
I've also started using a basic colour coding system with these highlighter tabs from daiso. It works great. I can see what I need to at a quick glance of colour with these tabs instead of needing to carry multiple coloured pens everywhere!
After reading so many positive comments about the DIYfish inserts I thought it may be time to give them a go. It took me a few months to build up the courage to try them though. I say 'courage' because it looked WAAAYYY complicated. Pages that open up and fold in on other pages, weeks that go vertically, monthly and weekly check lists and heaps of blank spaces. I didn't know if I'd be able to use all the sections let alone understand how they'd all fit together!
But I did it. I ordered the 3-month trial. However, I did cheat and got a lovely friend of mine from a Facebook planner group to print, cut and send them to me because I KNOW I would have gotten confused or not had the time or patience to put it all together and I would have given up! (Thank you Stephanie - you're an angel)
Once they arrived to my door, I got all excited, ripped open the packaging and my heart sunk... There were pages and pages in all shapes and sizes. I spent the first 15 minutes just staring at them thinking 'Why did I buy these?' 'How the hell am I going to put this crazy planner insert thingie together??'
But I persisted and watched a few You Tube videos to help me figure it all out. This video (here) from Nadine's Mixed Plate was a great help for understanding and ordering the inserts.
Once I figured them out I tried adding my regular information in the inserts and this is what I came up with...
Underwhelming isn't it! So then I started thinking 'What would I like to have in my planner that I couldn't add in my other inserts?' and I got to work filling out the empty spaces.
I am converted! Turns out I am now IN LOVE with these crazy DIYfish inserts! I now have everything I need all in one planner.
The left side of the Day page I use for to-do's (top-down for things to do at home and bottom-up for things to do out and about), the coloured stickers are for the washing system I use, and the section on the left is a calendar (not a lot on that day I guess!) The right side of the day page are for notes and the bottom half I use as a daily journal about my family and kids. I LOVE this. I have a filofax I used for journalling but only used it every now and again as life would get in the way and I'd forget. As my A5 planner is always open on my desk and always in use, it was much easier to remember to journal. I'm really enjoying it.
I had a good meal planning system, but this new system has made it GREAT. Below is my weekly menu plan:
I use the left side of the table to plan what I am going to make during the week. On the right is where I write all the ingredients needed for that meal. This is very helpful when prepping for my weekly grocery shop so I don't forget anything. As I have 2 young babies, going to the supermarket once a week is hard enough let alone going back a second time! Visit my meal planning video (here) to see my old system which still use the flag system.
I also write my dinner meal in my daily page:
I also enjoy the monthly tracker. I'm still feeling around with how it works and how it will work with my lifestyle. I have ideas to try for July and I will write and video an update later next month. Here it is at the moment:
I also have a section in my planner for a detailed look into my blogs and videos but I wanted to be able to view my next topic really quickly as I'm using the back of the weekly 'flap' and my quick dot point overview of my OrganisedLifestyle topic for the week to keep me on track, organised and easily accessible.
I've also started using a basic colour coding system with these highlighter tabs from daiso. It works great. I can see what I need to at a quick glance of colour with these tabs instead of needing to carry multiple coloured pens everywhere!
So this is it in a nut shell. It looks confusing and overwhelming but if you can get past the initial shock of how much is in here then you may discover how awesome this system is. It is really changing the way I plan for the better.
I. like most of us, am always evolving my planning system and I will do an update again in a few months but I am really enjoying this system so far.
Please visit my YouTube channel or click the link (here) to see the video where I show my DIYfish review in more detail.
You can also find my on my new OrganisedLifestyle Facebook page or Instagram.
Any questions or comments I'd love to hear from you!
Have a great day
Jen
I. like most of us, am always evolving my planning system and I will do an update again in a few months but I am really enjoying this system so far.
Please visit my YouTube channel or click the link (here) to see the video where I show my DIYfish review in more detail.
You can also find my on my new OrganisedLifestyle Facebook page or Instagram.
Any questions or comments I'd love to hear from you!
Have a great day
Jen
Friday, 6 June 2014
My Office Study Nook Setup
Hi guys. Well as we are now a family of 4 and we have a 3 bedroom house, I have lost my study/office room! As I'm still on maternity leave and not due back part time until the start of next year I am handling it but I NEED MY SPACE. So I have created a Office/study nook in the hallway of my house. It is a really nice desk so I don't mind showing it off but as it is in full view of everyone who enters my home it needs to be neat as well as functional. This is a challenge for me as I tend to create 'organised chaos' in my space!
So after some juggling around this is what I came up with.
Here is a shot of the top of my desk (a desk handed down from my grandfather-in-law who had it passed down to him). It is such a beautiful desk and just needs a new piece of leather as this piece is getting a bit tattered.
From left to right I have my current planners in use, my washi tape wheel from Costco, my inbox which holds mail to deliver and bills to pay and my iMac in the centre. A jar rack sits to the right of the computer which holds my pen box holder I brought for $1 from The Salvos. I love this rack as it creates another level, doubling my space. Under the jar rack lives my hole punch, sticky tape and stapler. I also have a lamp, a hand sanitiser and some candles (you can see the lighter sticking out of the pen box holder I use to light them). The two planners open are my personal aqua Malden (my wallet/appointment planner) and my A5 aqua Malden (my home maintenance planner). The A5 lives on my desk most of the time open just like this.
This is a shot of under the desk. My aim is to have this cleared soon as we are planning to make an above the desk storage unit in the next few months to reduce clutter. The basket on the left holds envelopes, paper and 2 Martha Stewart A4 folders. Next is my A3 laminator. The next box contains extra filofax inserts and dividers as well as my storage space for my planners which house past months inserts to reduce bulk in my current planners. I like to look back on past information from time to time. There is also a tunnel from Ikea for my daughter and a basket which is used as a paper bin.
I hope this has helped you realise that if you are in my situation where you are unable to use a dedicated room as an office then you still have options to create your own nook in your house to call your own :-)
Have a great day!
Jen
YouTube: www.youtube.com/user/organisedlifestyle
Instagram: www.instagram.com/organisedlifestyle
Facebook: https://www.facebook.com/pages/Organisedlifestyle/561178193999153?ref=bookmarks
So after some juggling around this is what I came up with.
I took this picture from the walkway from the lounge room which leads into the kitchen. (If you want a better idea of where the space is in relation to the house check out the corresponding video here).
To the left I have a set of 10 coloured drawers which I used previously as my teaching supplies at work. It's not the prettiest thing in the world to be shown in the hall, but for now it works.
Each drawer is labelled with a specific category: catch all (items which don't have a home currently or need to be filed away go here and get cleaned out at the end of each week), post it notes, stationary, misc (stationary items I like but don't use often - items I give away as RAKs or to friends), storage (a place to hold my travel planner bags and pens), laminating pouches, coloured texts and pencils, coloured paper, plastic pockets and immunisation records for the girls.
Sitting on top is my planner tote which houses all my favourite and on-the-go items for my planners I can plan and decorate in any room of the house. I tend to move the tote to under the desk when I have guests over in order to minimise the clutter. If you would like to see a video of the planner tote setup click here.
From left to right I have my current planners in use, my washi tape wheel from Costco, my inbox which holds mail to deliver and bills to pay and my iMac in the centre. A jar rack sits to the right of the computer which holds my pen box holder I brought for $1 from The Salvos. I love this rack as it creates another level, doubling my space. Under the jar rack lives my hole punch, sticky tape and stapler. I also have a lamp, a hand sanitiser and some candles (you can see the lighter sticking out of the pen box holder I use to light them). The two planners open are my personal aqua Malden (my wallet/appointment planner) and my A5 aqua Malden (my home maintenance planner). The A5 lives on my desk most of the time open just like this.
| A close up of the jar rack and pen box holder |
| A close up of one of the drawers in the desk. They are not very deep but are perfect for spare pens, Dymo labeller tape etc. |
This is a shot of under the desk. My aim is to have this cleared soon as we are planning to make an above the desk storage unit in the next few months to reduce clutter. The basket on the left holds envelopes, paper and 2 Martha Stewart A4 folders. Next is my A3 laminator. The next box contains extra filofax inserts and dividers as well as my storage space for my planners which house past months inserts to reduce bulk in my current planners. I like to look back on past information from time to time. There is also a tunnel from Ikea for my daughter and a basket which is used as a paper bin.
I hope this has helped you realise that if you are in my situation where you are unable to use a dedicated room as an office then you still have options to create your own nook in your house to call your own :-)
Have a great day!
Jen
YouTube: www.youtube.com/user/organisedlifestyle
Instagram: www.instagram.com/organisedlifestyle
Facebook: https://www.facebook.com/pages/Organisedlifestyle/561178193999153?ref=bookmarks
Friday, 30 May 2014
My new planner tote
Firstly, sorry I have been absent lately, I was off having my second baby girl :-) She is now almost 3 months old (oh my gosh!) and things are just now starting to settle back down to some sort of normality. We couldn't be happier with our little family! However, now we have 2 kids we no longer have a spare bedroom I can consume as my study (GASP!) We have a communal desk for hubby and I but all my craft and planner 'stuff' seems to occupy the majority of the space. Also, as the desk is in full view of everyone walking past the lounge room I found it difficult keeping it neat and tidy all the time.
Enter the idea of a planner tote! I thought that by getting a tote to carry all my supplies I would not be limited to one space and everything will be at my fingertips without it being strewn across the tiny desk for the whole world to see. I started googling and searching on Ebay right away. I was disheartened as everything was not quite what I wanted or over $100 which I was not prepared to spend. So what did I do... I took my complaints to the planner Facebook community (because lets face it, who else would understand!) Here one of my BRILLIANT Facebook friends explained to me that she was recently in a similar situation and found her answer at the local hardware store! She found a builders tool bag worked perfectly as a planner tote! It has heaps of pockets, open top for easy access, very solid sides and a very strong handle in order to hold the weight of all the tools.
So I went off (well ok I sent hubby on a detour on his way home from work) to our local Bunnings and Masters with strict instructions of what I wanted with a $20 limit. This is what he came home with:
BEST.BUY.EVER! I was over the moon. It was just what I wanted and the price was right :-)
So I went to work pimping it out and this is the final product:
Here you can see 4 pockets across the the front. The left flap contains my double sided tape. The next pocket holds 2 Kikki-K sticky note pads. Then is some super cute turtle note paper that looks as though it was made to fit! On the right pocket are some paper clips.
The 2 slit pockets behind, hold my Mark It dots and Kikki-K To-Do note pad on the left and my Kikki-K sticker book and a card from a beautiful friends of mine on the right.
The above picture shows one side of the bag. There is a metal bar attached to the side which is made to hold a tape measure (so my husband tells me) where I clip on my 4 sharpie markers. The pocket on the right is a perfect fit for my Rapesco planner hole punch! You can also see my washi tape which is threaded through a velcro strap back onto itself. I have absolutely no idea the real purpose of this strap but it is PERFECT for holding my washi as the velcro is super strong, easy access and out of the way!
The other side has 2 pockets, one in front of the other. The one in the back holds a pouch full of post it notes and page markers and flags as well as some note paper. The front pocket holds my Martha Stewart dew drop stickers, K-Mart sticker dots and K-Mart repositionable (so they say) and write-on stickers. You can also see another 'washi velcro strap' where I have attached my thin wash tape.
This side has one large zippered pocket along with 4 little pouches. As I use the zippered pouch often I do not keep anything in the mesh pockets as they would be constantly falling out.
Here is the zippered pouch opened containing my frixions 0.7mm pens, highlighter and rub-a-dub sharpie pen for writing on washi tape.
Here is a birds eye view of the top of my planner tote. It holds sooooo much. The handle in the middle is super comfortable to grab as it has some squishy foam and its also non-slip. The handle can move from side to side if you need to get in the middle of the bag.
The planners I have in there from the top down include: A5 Aqua Malden (my home management system), my new A5 Calipso in bright blue, my new personal size domino in violet and my personal size aqua Malden (my wallet/diary)
On one of the long inside walls of the bag are 3 pockets. Starting from the left I have: 3 lined post it notes (2 large, 1 medium size) and a Kikki-K note pad. The middle pocket contains a spiral note pad also from Kikki-K. The small pocket on the right holds my purple scissors.
The items next to the planners in the centre are my paper cutter, Dymo labeller and my fox zipper pencil case from Typo containing my 'go-to' stickers and page flags. I also have a note pad, and 2 pouches of stickers tucked in behind my A5 Malden.
I LOVE this setup! It works perfectly for my needs, keeps everything super organised, easy to access and a fantastic price... what more could a girl ask for!
If you want to see the video of my planner tote click here
Thanks for reading and if you have any questions please feel free to leave me a message!
Jen
P.S. I have just created a new Facebook page for my blog and YouTube channel if you would like to check it out :-)
You can also find me:
YouTube: www.youtube.com/user/organisedlifestyle
Facebook: organisedlifestyle
Instagram: http://instagram.com/organisedlifestyle
Sunday, 26 January 2014
Organising my pantry
Hi everyone :-)
I have had a few requests for a 'How I organise my pantry' blog and video so I thought I'd get it done now before the baby comes and I don't shop for 3 months! ;-)
Here is a breakdown of how I sort my pantry. This is how it looks all the time. I thought it would be best to show an honest view rather than after my 3-monthly clean and spruce up (so be nice!)
When we brought the house we noticed very quickly that the narrow pantry we had was very limited. It looked big enough but when it was full of food it would spill out and we had to reach really far in to get anything. We also had the problem that because of it being narrow and deep it was almost impossible to find anything and we would forever be re-buying stuff we didn't realise we had and finding out of date items way in the back. Quite frankly, it was costing us a fortune!!
So what I ended up doing was a 1-2 day shop. I would buy what I needed for a couple of days and go again a few days later. Not only was this costing us more money doing it this way but I don't enjoy cooking at the best of times and it was such a hassle that sometimes when Dave and I got home from work we would just have 2 minute noodles, toast or take away!
We needed inspiration so off we went off to Ikea where we found the perfect solution to our problems. Here we saw pull out drawers for deep narrow spaces like ours. You can pull out the whole drawer/shelf and can get easy access to everything and can see all the way to the back. It was perfect! The only problem was they were not cheap. However, having a carpenter as a husband can be very 'handy' at times I tell you! So when we got home I sent him to work building pull out drawers for our pantry.
The 5 drawers (from the bottom) are all pull out drawers and we left the top two as they were. That space is for items we don't use often as I can't even reach them standing on a chair! The bottom drawer is made out of a thicker timber (and I still need to paint it!) FYI - if you do not have a magnetic knife strip thingie then do yourself a favour and get one! They are fantastic, quick and easy to find which knife you want and gives you extra space on your kitchen table top (and we all need more of that!)
THINGS THAT HELP ME STAY ORGANISED IN THE PANTRY
1. If you have a space like mine, get a pull out drawer. They will change your life and ultimately save you money as you know what you have and have easy access.
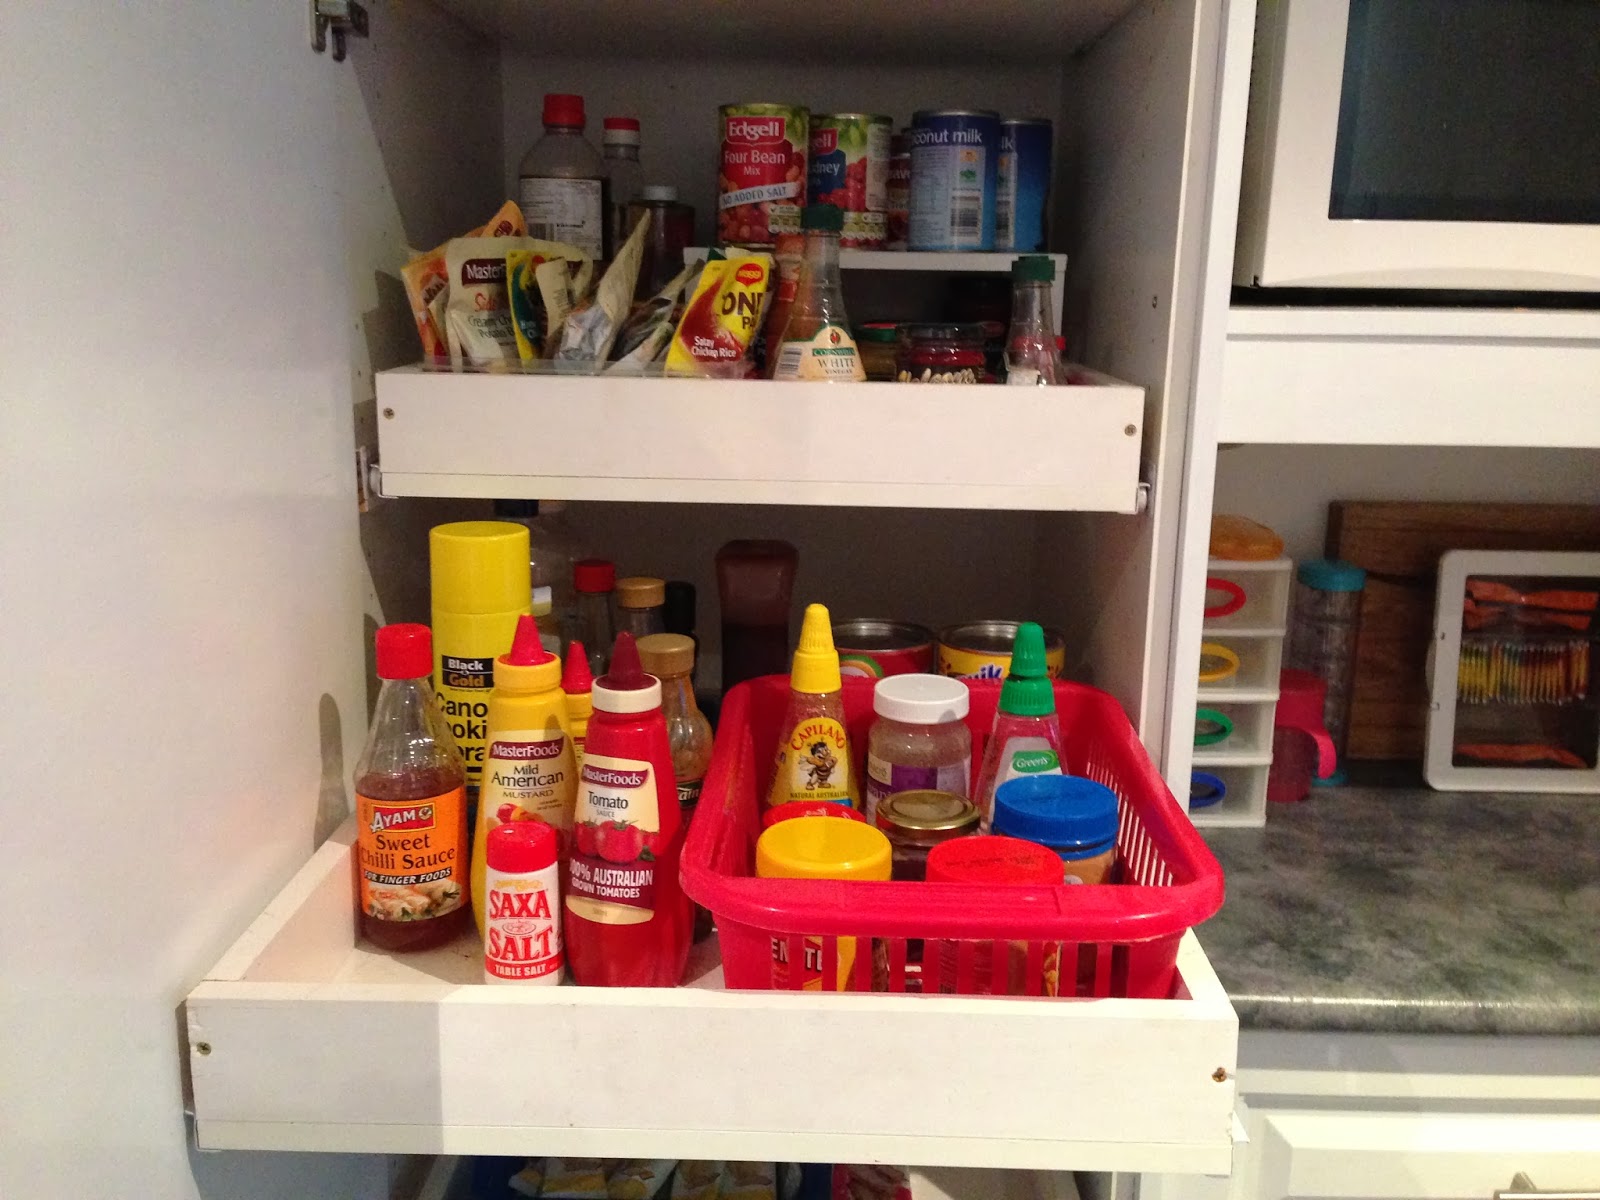
2. Group items into categories and place them into baskets. This way everything is right where you want it at all times and everyone knows where they belong. The above picture shows all sauces and oils on the left and in the red basket on the right are all condiments. Below is another example where all the packet mix products are upright in their own basket where they are secure and easy to flick through to find what you are looking for.
3. If you have a young child I find it easy to have a 'kid drawer'. Here I know all her snacks are here so I can grab them quick as I head out the door.
4. I try to unbox as much as I can and place into a basket or container so I know how many I have left. It is a pet hate of mine when you go to grab something out of a box to find it empty! Grrrr...
5. Get yourself a tiered stand. Best invention ever!! These little babies give you twice as much room in your pantry and you can see everything so much better. Perfect for cans as you can see in the picture below. You can buy them quite cheap from $2.00 shops (they are not quite $2 but what is nowadays!) FYI - they are also fantastic to use on you home or office desk!
I have had a few requests for a 'How I organise my pantry' blog and video so I thought I'd get it done now before the baby comes and I don't shop for 3 months! ;-)
Here is a breakdown of how I sort my pantry. This is how it looks all the time. I thought it would be best to show an honest view rather than after my 3-monthly clean and spruce up (so be nice!)
When we brought the house we noticed very quickly that the narrow pantry we had was very limited. It looked big enough but when it was full of food it would spill out and we had to reach really far in to get anything. We also had the problem that because of it being narrow and deep it was almost impossible to find anything and we would forever be re-buying stuff we didn't realise we had and finding out of date items way in the back. Quite frankly, it was costing us a fortune!!
So what I ended up doing was a 1-2 day shop. I would buy what I needed for a couple of days and go again a few days later. Not only was this costing us more money doing it this way but I don't enjoy cooking at the best of times and it was such a hassle that sometimes when Dave and I got home from work we would just have 2 minute noodles, toast or take away!
We needed inspiration so off we went off to Ikea where we found the perfect solution to our problems. Here we saw pull out drawers for deep narrow spaces like ours. You can pull out the whole drawer/shelf and can get easy access to everything and can see all the way to the back. It was perfect! The only problem was they were not cheap. However, having a carpenter as a husband can be very 'handy' at times I tell you! So when we got home I sent him to work building pull out drawers for our pantry.
The 5 drawers (from the bottom) are all pull out drawers and we left the top two as they were. That space is for items we don't use often as I can't even reach them standing on a chair! The bottom drawer is made out of a thicker timber (and I still need to paint it!) FYI - if you do not have a magnetic knife strip thingie then do yourself a favour and get one! They are fantastic, quick and easy to find which knife you want and gives you extra space on your kitchen table top (and we all need more of that!)
THINGS THAT HELP ME STAY ORGANISED IN THE PANTRY
1. If you have a space like mine, get a pull out drawer. They will change your life and ultimately save you money as you know what you have and have easy access.
2. Group items into categories and place them into baskets. This way everything is right where you want it at all times and everyone knows where they belong. The above picture shows all sauces and oils on the left and in the red basket on the right are all condiments. Below is another example where all the packet mix products are upright in their own basket where they are secure and easy to flick through to find what you are looking for.
3. If you have a young child I find it easy to have a 'kid drawer'. Here I know all her snacks are here so I can grab them quick as I head out the door.
4. I try to unbox as much as I can and place into a basket or container so I know how many I have left. It is a pet hate of mine when you go to grab something out of a box to find it empty! Grrrr...
5. Get yourself a tiered stand. Best invention ever!! These little babies give you twice as much room in your pantry and you can see everything so much better. Perfect for cans as you can see in the picture below. You can buy them quite cheap from $2.00 shops (they are not quite $2 but what is nowadays!) FYI - they are also fantastic to use on you home or office desk!
6. If you haven't already, get yourself a labeller. I think my husband thinks it's surgically attached to my arm at times. It not only helps you to keep organised but also the other members of your family. You may know where things belong, but when you label it EVERYONE knows! Less work for you and no excuses from them :-)
So there is a look into my kitchen pantry and how I organise things. Nothing 'world-first' about it all by any means, but it's what is working for us at the moment. If you have any tips on how you organise your pantry please leave them in the comments below as I am always on the lookout for better ways to organise myself!
I hope you are all having a great day!
Jen
Sunday, 19 January 2014
2014 Goals layout for my Filofax
I have never been a great New Years Resolution keeper. I would do the typical super keen for ten minutes thing then fall back into old routines and habits but now with the added guilt of not doing what I set out to do and feeling like a failure.
So for this year I thought about goals I really could achieve and tools I could implement to really help with these goals and this is what I came up with.
I created a new tabbed section in the back of my Filofax labelled (you guessed it, GOALS). I have a cover page where I have 4 spaces for 4 different (and achievable) goals that are important to me. Below those sections are 4 sub sections to help nut out those goals. Again I made 4 goals with 4 sub sections only so I didn't spread myself too thin and fail before I even begun.
Then my goals are broken down into months. Small achievable tasks in the areas of: Health, Relationships, Finances, Personal Development, Organisation and Travel & Experiences. I only put 1-2 mini goals in each area. I also include a calendar where I can plot when I can do some of these tasks, counting down days, ticking down the days etc.
I check on my goals each week to make sure I am keeping on track and use these lists to keep me motivated and accountable. So far so good (I have usually given up by now) :-)
I will review this system in a blog mid year to let you know how I am going and whether these templates have helped my goal keeping.
I hope you are all having a great start to the year and as always if you have any questions or comments please feel free to leave a comment below and I'll get back to you.
Enjoy your week!
Jen
So for this year I thought about goals I really could achieve and tools I could implement to really help with these goals and this is what I came up with.
I created a new tabbed section in the back of my Filofax labelled (you guessed it, GOALS). I have a cover page where I have 4 spaces for 4 different (and achievable) goals that are important to me. Below those sections are 4 sub sections to help nut out those goals. Again I made 4 goals with 4 sub sections only so I didn't spread myself too thin and fail before I even begun.
Then my goals are broken down into months. Small achievable tasks in the areas of: Health, Relationships, Finances, Personal Development, Organisation and Travel & Experiences. I only put 1-2 mini goals in each area. I also include a calendar where I can plot when I can do some of these tasks, counting down days, ticking down the days etc.
I check on my goals each week to make sure I am keeping on track and use these lists to keep me motivated and accountable. So far so good (I have usually given up by now) :-)
I will review this system in a blog mid year to let you know how I am going and whether these templates have helped my goal keeping.
I hope you are all having a great start to the year and as always if you have any questions or comments please feel free to leave a comment below and I'll get back to you.
Enjoy your week!
Jen
Subscribe to:
Posts (Atom)